Sort Objects
Use this effect to sort objects, and let the user sort objects interactively in tasks. This is useful, for example when a data source should be ordered after several read object effects, or when the user wants to control the order when merging or printing documents.
To sort objects, do the following.
- In the Name box, optionally type a name. The name is displayed in the action tree, if a name is not entered, a summary of the effect is displayed.
- In the Description box, optionally type a description.
- In the Data Source box, select the data source to sort. Only data sources of type Object with many occurences can be selected. In addition, it is not possible to select a data source that are used in an enumerator, if the effect is within the enumerator, since this would affect the sequence of iterations.
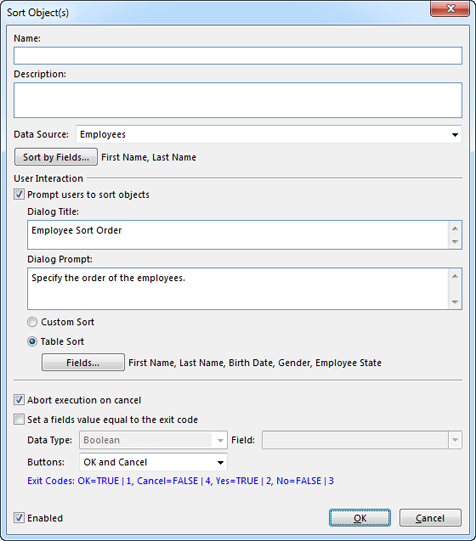
- To specify which fields to sort the objects on, click Sort by fields. To add a field, click Add, and then click [...] to select a field. In the sort order column, select Ascending or Descending order for each field. To change the order of the fields, select the field in the list, and click Move Up or Move Down.
- To allow the user to sort the objects interactively, in the User Interaction section, select the Promt user to sort objects check box. If this option is enabled, the sorting specified above is presented as a default sorting which the user can accept or change.
- In the Dialog Title and Dialog Prompt box, type a title and a prompt. You can generate dynamic values for the title and prompt by inserting fields from your data sources.
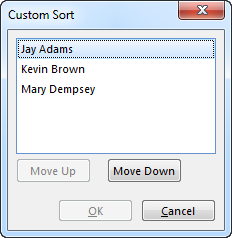
- Select Custom Sort, if you want the user to move individual objects up or down in a list of objects. To the user this option looks like this:
- Select Table Sort, if you want the user to sort objects in a table by clicking the appropriate column headers. The custom sort list is also available from the table, by clicking Custom Sort. To the user this option looks like this:
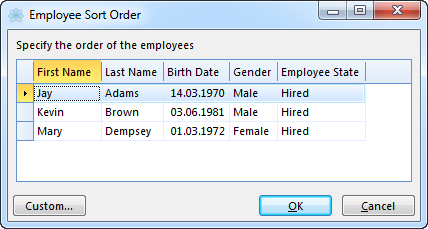
- Click Fields, to specify the fields to be displayed in the dialog. It is recommended to include all the fields used for the initial sorting specified above. This option is only available if Table Sort is selected.
- Select the Exit Task on cancel check box if you do not want to execute suceeding effects if the user chooses the Cancel or No button in the dialog box.
- To store which button chosen by the user, click Set a fields value equal to the exit code. You can either store the response as a boolean value or an integer value. See the article Dialog Box Exit Codes for an overview of exit codes.
- Select which buttons that should appear in the dialog box.